
Nothing says “special occasion” quite like a platter of freshly baked cream puffs, their golden shells giving way to clouds of silky sweet filling. Mom’s Famous Cream Puffs have been a family tradition for generations, delighting guests at birthdays, holidays and casual Sunday teas alike. In this comprehensive guide, you’ll learn how to craft the perfect pâte à choux shells, whip up Mom’s signature vanilla cream filling, and discover pro tips to guarantee impressive, restaurant-quality results every time.
Why Cream Puffs Are So Magical
Cream puffs belong to the French pastry family known as pâte à choux, which also includes éclairs and gougères. Unlike other doughs, pâte à choux relies on steam rather than yeast or chemical leaveners to puff into hollow, airy shells. This steam-driven rise creates the ideal vessel for holding luscious fillings—from sweet creams to savory cheeses.
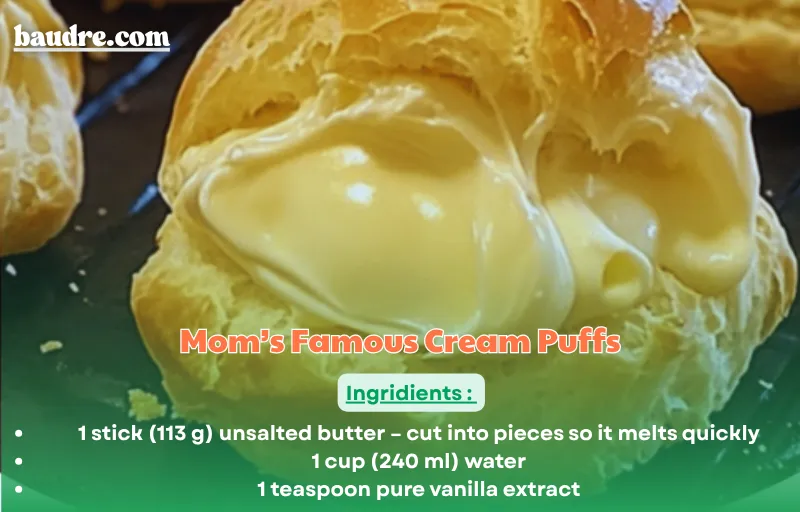
Mom’s version stands out because she pairs a light, crisp exterior with a rich, velvety filling flavored by vanilla pudding and freshly whipped cream. The contrast between the crunchy shell and the pillowy center is what keeps everyone coming back for “just one more.”
Ingredients You’ll Need
Before you begin, assemble all of the following. Having everything measured and at hand (mise en place) makes the process smooth and stress-free.
For the Pastry Shells
- 1 stick (113 g) unsalted butter – cut into pieces so it melts quickly
- 1 cup (240 ml) water
- 1 teaspoon pure vanilla extract
- 1 cup (125 g) all-purpose flour – spooned and leveled
- 4 large eggs, at room temperature
For Mom’s Famous Filling
- 1 pint (480 ml) heavy cream – cold for optimal volume
- 1 package (3.4 oz / 96 g) instant vanilla pudding mix
- ⅓ cup (80 ml) whole milk
Chef’s Note: Using cold cream and chilled mixing bowls helps the whipped cream achieve maximum lift.
Equipment Essentials
- Saucepan with a heavy bottom (to prevent scorching)
- Wooden spoon or heatproof spatula
- Mixing bowls (one medium for dough, one large for filling)
- Piping bag fitted with a medium round tip (or a resealable plastic bag with the corner snipped)
- Baking sheets lined with parchment paper
- Wire rack for cooling
- Toothpicks (for deflating shells)
Step-By-Step Instructions
Prepare the Pastry Base
- Heat your oven to 400°F (205°C) and line two baking sheets with parchment paper.
- In the saucepan, combine the water and butter pieces. Warm over medium heat until the butter melts and the mixture comes to a rolling boil.
- Remove from heat immediately. Stir in the vanilla extract, then add all of the flour at once. Stir vigorously until the dough pulls away from the pan sides and forms a smooth ball.
Incorporate the Eggs
- Transfer the hot dough into a mixing bowl (or leave in the saucepan off heat). Let rest for 2 minutes to prevent the eggs from cooking.
- Crack in one egg and beat thoroughly until fully absorbed. The dough will look wet and glossy.
- Add eggs one at a time, mixing completely before each addition. You’ll know you’re done when the dough falls from the spoon in a thick ribbon and holds its shape.
Shape and Bake the Shells
- Spoon or pipe twelve generous mounds (about 2 inches across) onto each prepared sheet, leaving 2 inches between each for expansion.
- Bake at 400°F (205°C) for 40 minutes. Resist opening the oven door early, as the sudden temperature drop can make the shells collapse.
- After 40 minutes, test one shell with a toothpick: insert it into the side to release steam, then crack the oven door and let all the cream puffs cool inside for 10 minutes. This gentle deflation prevents soggy centers while preserving the hollow interior.
- Move the baked shells onto a wire rack and allow them to cool fully.
Whip Up the Signature Filling
- In a large chilled bowl, whisk together the pudding mix and milk until smooth—no lumps should remain.
- Pour in the cold heavy cream and beat with an electric mixer on medium-high speed. Stop when stiff peaks form, indicating the cream holds its shape firmly.
- If you prefer a sweeter or more custardy texture, fold in an additional tablespoon of powdered sugar or a splash of vanilla extract.
5. Assemble Your Cream Puffs
- Slice each cooled shell horizontally or poke a small hole in the base.
- Transfer the whipped cream filling into your piping bag. Pipe a generous swirl into the center of each shell until you feel gentle resistance.
- Replace the top halves, dust with powdered sugar or drizzle with melted chocolate, and serve immediately—or refrigerate for up to two hours before serving.
Mom’s Famous Cream Puffs: An Elegant, Airy Indulgence
Ingredients
For the Pastry Shells
- 1 stick (113 g) unsalted butter – cut into pieces so it melts quickly
- 1 cup (240 ml) water
- 1 teaspoon pure vanilla extract
- 1 cup (125 g) all-purpose flour – spooned and leveled
- 4 large eggs, at room temperature
For Mom’s Famous Filling
- 1 pint (480 ml) heavy cream – cold for optimal volume
- 1 package (3.4 oz / 96 g) instant vanilla pudding mix
- ⅓ cup (80 ml) whole milk
Instructions
Prepare the Pastry Base
- Heat your oven to 400°F (205°C) and line two baking sheets with parchment paper.
- In the saucepan, combine the water and butter pieces. Warm over medium heat until the butter melts and the mixture comes to a rolling boil.
- Remove from heat immediately. Stir in the vanilla extract, then add all of the flour at once. Stir vigorously until the dough pulls away from the pan sides and forms a smooth ball.
Incorporate the Eggs
- Transfer the hot dough into a mixing bowl (or leave in the saucepan off heat). Let rest for 2 minutes to prevent the eggs from cooking.
- Crack in one egg and beat thoroughly until fully absorbed. The dough will look wet and glossy.
- Add eggs one at a time, mixing completely before each addition. You’ll know you’re done when the dough falls from the spoon in a thick ribbon and holds its shape.
Shape and Bake the Shells
- Spoon or pipe twelve generous mounds (about 2 inches across) onto each prepared sheet, leaving 2 inches between each for expansion.
- Bake at 400°F (205°C) for 40 minutes. Resist opening the oven door early, as the sudden temperature drop can make the shells collapse.
- After 40 minutes, test one shell with a toothpick: insert it into the side to release steam, then crack the oven door and let all the cream puffs cool inside for 10 minutes. This gentle deflation prevents soggy centers while preserving the hollow interior.
- Move the baked shells onto a wire rack and allow them to cool fully.
Whip Up the Signature Filling
- In a large chilled bowl, whisk together the pudding mix and milk until smooth—no lumps should remain.
- Pour in the cold heavy cream and beat with an electric mixer on medium-high speed. Stop when stiff peaks form, indicating the cream holds its shape firmly.
- If you prefer a sweeter or more custardy texture, fold in an additional tablespoon of powdered sugar or a splash of vanilla extract.
5. Assemble Your Cream Puffs
- Slice each cooled shell horizontally or poke a small hole in the base.
- Transfer the whipped cream filling into your piping bag. Pipe a generous swirl into the center of each shell until you feel gentle resistance.
- Replace the top halves, dust with powdered sugar or drizzle with melted chocolate, and serve immediately—or refrigerate for up to two hours before serving.
Pro Tips for Perfect Results
- Use Room-Temperature Eggs: They emulsify into the dough more readily, yielding a lighter shell.
- Avoid Moisture: If you notice any steam or moisture on your cooling rack, blot it away quickly to keep shells crisp.
- Test for Doneness: A well-baked shell should sound hollow when tapped on the bottom.
- Chill Before Serving: While assembled puffs are best eaten the day they’re filled, chilling them for 10–15 minutes firms up the cream and enhances the contrast in textures.
Creative Variations
- Chocolate Cream Puffs: Fold 2 tablespoons of cocoa powder into the flour for a chocolate shell, and use chocolate pudding in the filling.
- Fruit-Filled Delights: Swap half the pudding mix for strawberry or lemon flavor, and garnish with fresh berries or candied citrus peel.
- Coffee Cream Puffs: Dissolve 1 tablespoon of instant espresso in the milk before mixing filling for a mocha twist.
- Savory Gougères: Omit pudding; add ½ cup grated Gruyère to the dough and serve warm as an appetizer.
Make-Ahead and Storage Guidelines
- Pastry Shells: Baked, unfilled shells can be stored in an airtight container at room temperature for up to two days. Re-crisp in a 300°F (150°C) oven for 5 minutes if needed.
- Filling: Whipped cream filling holds in the refrigerator for up to 24 hours. Gently re-whip if it starts to lose volume.
- Fully Assembled Puffs: Best enjoyed within two hours of filling. After that, the shells may soften from moisture transfer.
Frequently Asked Questions
Why did my cream puffs collapse?
Opening the oven early or not allowing the shells to air out slowly can cause collapse. Always maintain oven temperature and use the toothpick/oven-door technique to release steam gradually.
Can I freeze the filled puffs?
Freezing filled cream puffs isn’t recommended because the filling can become watery upon thawing. Instead, freeze unfilled shells in a sealed bag for up to one month; thaw and re-crisp before filling.
How can I make smaller or larger cream puffs?
Simply adjust the piped mound size. For bite-sized versions, pipe 1-inch dollops and reduce bake time to 25–30 minutes. Jumbo puffs (3 inches) may need up to 50 minutes.
Final Thoughts
Mom’s Famous Cream Puffs embody the magic of simple ingredients transformed by technique. Crisp, golden shells give way to an ethereal cream filling that always leaves a lasting impression. With this guide in hand, you’ll gain the confidence to bake show-stopping cream puffs for every occasion—whether it’s a festive gathering, a romantic dessert, or simply an afternoon treat to brighten your day. Happy baking!