
Few baked goods hold as much nostalgic charm and culinary delight as Old-School Southern Yeast Rolls. These rolls embody everything we love about Southern baking — soft, pillowy interiors, golden buttery crusts, and a comforting aroma that fills the kitchen like a warm embrace. Perfect for sopping up rich gravies, spreading with honey or butter, or enjoying fresh from the oven, these rolls are a classic recipe passed down through generations. They carry not just flavor, but tradition, stories, and the kind of homemade love that only grandma can impart.
In this detailed guide, you’ll learn how to make these legendary yeast rolls from scratch, with tips to ensure success even if you’re new to bread baking. Whether you’re making them for a holiday feast or a simple family dinner, these rolls will become a cherished staple in your home.
Why Southern Yeast Rolls Are So Beloved
Southern yeast rolls are iconic because of their texture and versatility. Their light, tender crumb is almost cloud-like — a contrast to the golden, slightly crisp crust that envelops each roll. When baked properly, they are irresistibly soft yet sturdy enough to hold up to butter, honey, or even hearty sauces.
These rolls don’t just accompany meals; they enhance them. Whether you’re serving fried chicken, roast beef with gravy, or a classic Southern brunch, these rolls soak up juices and flavors beautifully. They’re perfect for family gatherings, potlucks, holiday dinners, or anytime you want a little taste of Southern comfort.
The Authentic Southern Yeast Rolls Recipe: What You’ll Need
This recipe yields 24 generously sized rolls and includes a sponge starter to develop flavor and texture.
The Sponge (Starter)
- 1 cup warm whole milk (around 110°F) — activates the yeast
- 2 teaspoons sugar — feeds the yeast for fermentation
- 1 packet (2¼ teaspoons) active dry yeast — the leavening agent
- ½ cup flour — helps form the starter’s base
The Dough
- ½ cup sugar — adds sweetness and tenderizes the crumb
- 1 stick (8 tablespoons) unsalted butter, melted and cooled — richness and flavor
- 2 large eggs, beaten — structure and moisture
- 1 teaspoon salt — balances flavor and strengthens dough
- 4 to 5 cups bread flour (or all-purpose if necessary) — gives structure and elasticity
The Finish
- ¼ cup melted butter (for brushing after baking) — adds shine and flavor
- Coarse sea salt (optional) — adds crunch and a savory touch if desired
Step-by-Step Directions: Grandma’s Method for Perfect Rolls
Step 1: Wake Up the Yeast
Begin by preparing the sponge starter, which is a mixture that encourages the yeast to activate and develop flavor. In a large mixing bowl, combine the warm whole milk, sugar, yeast, and half a cup of flour. Stir gently until all ingredients are incorporated. Cover the bowl with a clean towel or plastic wrap and let it sit in a warm spot for about 15 minutes, or until the mixture becomes bubbly and frothy. This bubbling indicates that the yeast is active and ready to leaven your dough.
Step 2: Build the Dough
To the bubbly sponge, add the remaining sugar, melted and cooled butter, beaten eggs, and salt. Stir to combine everything well. Begin adding the flour gradually, one cup at a time, stirring after each addition. Continue until the dough starts pulling away from the sides of the bowl and forms a soft, slightly sticky mass.
Step 3: Knead with Love
Turn the dough out onto a clean, lightly floured surface. Knead it by hand for about 8 to 10 minutes until it becomes smooth, elastic, and slightly tacky but not sticky. Kneading develops the gluten, which gives the rolls their characteristic chewy texture. Some bakers swear by singing hymns or soft tunes during this step — folklore suggests it makes the rolls lighter and more tender!
Step 4: Let It Rise
Grease a large bowl with butter or oil. Place the kneaded dough in the bowl and turn it to coat with grease. Cover the bowl with a damp towel or plastic wrap to retain moisture. Let the dough rise in a warm, draft-free place for 1 to 2 hours, or until it has doubled in size. The warmer your environment, the faster it will rise.
Step 5: Shape and Proof
After the dough has doubled, gently punch it down to release excess air. Divide it into 24 equal pieces — about the size of a golf ball. Roll each piece into a smooth ball and arrange them in greased baking pans. Leave space between each ball if you prefer distinct rolls or place them closer for pull-apart rolls. Cover the pans loosely with a towel and allow the rolls to rise again for about 45 minutes to 1 hour, until they puff up nicely.
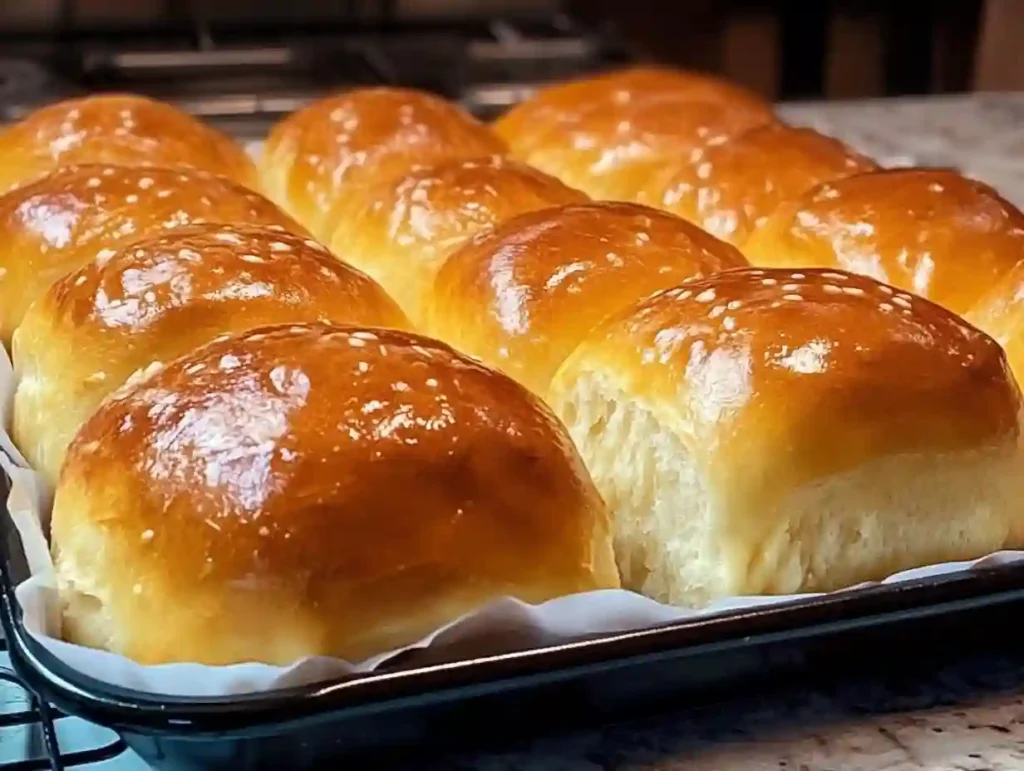
Step 6: Bake to Golden Perfection
Preheat your oven to 375°F. Bake the rolls for 15 to 18 minutes, until their tops turn a beautiful golden brown. Remove the rolls from the oven and immediately brush them generously with melted butter. This last step seals in moisture and gives the rolls a glossy, buttery finish that makes them irresistible.
Old-School Secrets for Tender, Fluffy Rolls
- Use Potato Water: For extra softness, replace a quarter cup of the milk in the sponge with water from boiled potatoes. The starch adds tenderness to the dough.
- Honey for Sweetness: Adding a tablespoon of honey to the dough introduces a subtle sweetness and helps create a tender crumb.
- Refrigerate Shaped Rolls: Shape the rolls and refrigerate them overnight. Bake fresh the next morning for warm, just-baked rolls with minimal morning prep.
- Don’t Over-Flour: Use flour sparingly when kneading to keep the dough soft and moist.
- Warm Rising Spot: A slightly warm but not hot place encourages the yeast to rise optimally without killing it.
Troubleshooting Common Problems
- Dense Rolls: Usually caused by over-kneading or using too much flour. Knead just until smooth and add flour gradually.
- Slow Rising: Yeast might be old or milk too hot/cold. Ensure yeast is fresh and milk is about 110°F.
- Crust Too Hard: Too much sugar or over-baking can cause hard crusts. Brush with butter immediately after baking to keep soft.
- Sticky Dough: This is normal to some extent; avoid adding excessive flour during kneading.
Storage and Freezing Tips
These rolls are best enjoyed fresh but can be stored in airtight containers or resealable bags at room temperature for up to two days. For longer storage, freeze cooled rolls wrapped tightly in foil or plastic wrap for up to three months. To reheat, thaw at room temperature and warm in a 350°F oven for 5-10 minutes. Avoid refrigerating for long periods, as it dries out the rolls.
Final Thoughts
Old-School Southern Yeast Rolls bring the warmth of Southern hospitality right into your kitchen. Their soft, buttery crumb and golden crust offer a perfect balance of texture and flavor, making them ideal for any meal or occasion. With a simple recipe that honors tradition and tips passed down through generations, these rolls will quickly become a beloved staple in your home baking repertoire. So roll up your sleeves, dust off the flour, and enjoy baking a batch of these heavenly rolls that taste just like grandma’s.
Enjoy the authentic taste and comforting texture of these classic Southern yeast rolls, and watch how quickly they disappear from your table!