
When classic Southern flavors meet a whimsical presentation, the result is nothing short of magic. Peach Cobbler Cheesecake Cones take the warm, comforting taste of peach cobbler and marry it with the cool creaminess of cheesecake, all served inside a crisp waffle cone. Whether you’re hosting a backyard barbecue, planning a festive summer party, or simply craving something sweet and playful, these cones make an unforgettable treat. Follow this step-by-step guide to craft a batch of Peach Cobbler Cheesecake Cones that will have everyone asking for more.
Why You’ll Love These Cones
- Handheld Comfort
No forks or plates required. The combination of hot cobbler and chilled cheesecake inside a crunchy cone makes for easy, mess-free enjoyment. - Flavor Contrast
Warm, cinnamon-spiced peaches mingle with tangy cheesecake filling, creating a delightful balance of sweet, tart, and creamy. - Crowd-Pleasing Appeal
Guests of all ages adore the novelty of eating peach cobbler from a cone. It’s perfect for summer cook-outs, holiday gatherings, or even as a fun weeknight dessert. - Make-Ahead Friendly
Feel free to bake the cobbler and whip up the cheesecake filling ahead of time; assemble the cones right before serving so they stay wonderfully crisp.
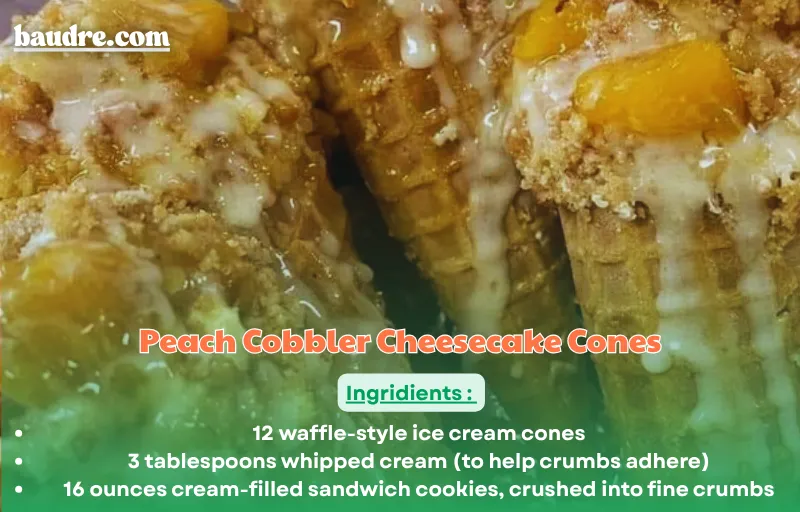
Ingredients
For the Cones
- 12 waffle-style ice cream cones
- 3 tablespoons whipped cream (to help crumbs adhere)
- 16 ounces cream-filled sandwich cookies, crushed into fine crumbs
For the Peach Cobbler Filling
- 48 ounces sliced peaches with their juice (fresh or canned)
- 1 box (about 15 ounces) yellow or French vanilla cake mix
- 1 cup salted butter, melted
- 1½ teaspoons ground cinnamon
For the Cheesecake Filling
- 16 oz cream cheese, softened to room temperature.
- 1 cup confectioners’ sugar, sifted
- 1 teaspoon pure vanilla extract
- ½ teaspoon lemon juice (optional, for brightness)
- 1 cup heavy whipping cream, chilled
For Finishing Touches (Optional)
- Melted chocolate or caramel for drizzling
- Additional crushed cookies or chopped nuts as garnish
Equipment
- 9×13-inch baking dish or similarly sized pan
- Medium mixing bowl for cobbler ingredients
- Large mixing bowl for cheesecake filling
- Electric mixer or handheld whisk
- Piping bag or sturdy spoon for filling cones
- A baking sheet or a wire cooling rack.
- Sharp knife or spatula
Step-By-Step Instructions
1. Bake the Peach Cobbler Base
Begin by heating your oven to 350°F and lightly coating a 9×13-inch baking pan with nonstick spray. Pour the peaches, juices and all, into the prepared dish and smooth them into an even layer. Evenly dust the dry cake mix over the fruit, then drizzle the melted butter in thin streams on top. Finish with a sprinkle of ground cinnamon. Bake for 45–55 minutes, until the crust turns golden and the edges bubble. Remove from the oven and let the cobbler cool fully on the counter—about 30 minutes—before serving or assembling your cones.
2. Prepare the Cheesecake Filling
As the cobbler comes to room temperature, prepare the cheesecake filling. In a large bowl, beat the softened cream cheese with the powdered sugar, vanilla, and lemon juice until silky. In a separate chilled bowl, whip the heavy cream to firm peaks. Carefully fold the whipped cream into the cream cheese mixture until light and uniform. Cover and chill until you’re ready to assemble the cones.
3. Coat and Decorate the Cones
In a small bowl, lightly whip the 3 tablespoons of whipped cream until slightly thickened. Hold each cone upside-down and dip its rim into the whipped cream, then immediately press into the crushed cookie crumbs to create a decorative, crunchy edge. Set the cones upright in a muffin tin or on a baking sheet to keep them stable.
4. Fill the Cones
Scoop alternating spoonfuls of the cooled peach cobbler and cheesecake filling into each cone. Aim for three or four layers—starting and ending with cheesecake—to balance temperature and texture. If you prefer, transfer the cheesecake filling to a piping bag fitted with a large round or star tip for neater layers.
5. Add Final Garnishes
Drizzle melted chocolate or caramel over the top of each filled cone for an extra touch of decadence. Sprinkle additional crushed cookies, chopped pecans, or a pinch of cinnamon on top. Serve immediately so the cones stay crisp and the contrasts remain vivid.
Print
Peach Cobbler Cheesecake Cones: A Fun and Flavorful Dessert
Ingredients
For the Cones
- 12 waffle-style ice cream cones
- 3 tablespoons whipped cream (to help crumbs adhere)
- 16 ounces cream-filled sandwich cookies, crushed into fine crumbs
For the Peach Cobbler Filling
- 48 ounces sliced peaches with their juice (fresh or canned)
- 1 box (about 15 ounces) yellow or French vanilla cake mix
- 1 cup salted butter, melted
- 1½ teaspoons ground cinnamon
For the Cheesecake Filling
- 16 oz cream cheese, softened to room temperature.
- 1 cup confectioners’ sugar, sifted
- 1 teaspoon pure vanilla extract
- ½ teaspoon lemon juice (optional, for brightness)
- 1 cup heavy whipping cream, chilled
For Finishing Touches (Optional)
- Melted chocolate or caramel for drizzling
- Additional crushed cookies or chopped nuts as garnish
Instructions
Begin by heating your oven to 350°F and lightly coating a 9×13-inch baking pan with nonstick spray. Pour the peaches, juices and all, into the prepared dish and smooth them into an even layer. Evenly dust the dry cake mix over the fruit, then drizzle the melted butter in thin streams on top. Finish with a sprinkle of ground cinnamon. Bake for 45–55 minutes, until the crust turns golden and the edges bubble. Remove from the oven and let the cobbler cool fully on the counter—about 30 minutes—before serving or assembling your cones.
As the cobbler comes to room temperature, prepare the cheesecake filling. In a large bowl, beat the softened cream cheese with the powdered sugar, vanilla, and lemon juice until silky. In a separate chilled bowl, whip the heavy cream to firm peaks. Carefully fold the whipped cream into the cream cheese mixture until light and uniform. Cover and chill until you’re ready to assemble the cones.
In a small bowl, lightly whip the 3 tablespoons of whipped cream until slightly thickened. Hold each cone upside-down and dip its rim into the whipped cream, then immediately press into the crushed cookie crumbs to create a decorative, crunchy edge. Set the cones upright in a muffin tin or on a baking sheet to keep them stable.
Scoop alternating spoonfuls of the cooled peach cobbler and cheesecake filling into each cone. Aim for three or four layers—starting and ending with cheesecake—to balance temperature and texture. If you prefer, transfer the cheesecake filling to a piping bag fitted with a large round or star tip for neater layers.
Drizzle melted chocolate or caramel over the top of each filled cone for an extra touch of decadence. Sprinkle additional crushed cookies, chopped pecans, or a pinch of cinnamon on top. Serve immediately so the cones stay crisp and the contrasts remain vivid.
Tips for Success
- Chill Your Cream: Cold whipping cream yields firmer peaks and a lighter filling.
- Crush Cookies Finely: A coffee grinder or food processor works best to achieve a fine crumb for coating.
- Avoid Soggy Cones: Only fill cones just before serving to prevent them from softening.
- Even Layers: Use a measuring spoon or small ice-cream scoop to portion consistent layers.
- Flavor Variations: Substitute almond extract for vanilla in the cheesecake filling, or use a spice cake mix for deeper flavor in the cobbler.
Make-Ahead and Storage
You can bake the cobbler and prepare the cheesecake filling up to 6 hours in advance. Store the cobbler, covered, at room temperature once cooled. Keep the cheesecake filling refrigerated. Assemble cones just before serving. Unfilled cones keep at room temperature for up to two days in an airtight container. Assembled cones are best enjoyed within 30 minutes.
Serving Suggestions
Arrange the filled cones upright in a decorative basket lined with a kitchen towel or in a cone-holder stand. Accompany with fresh peach slices, berries, or a small pitcher of extra melted chocolate on the side for dipping. Pair with iced coffee, lemonade, or sparkling rosé for a delightful summer spread.