
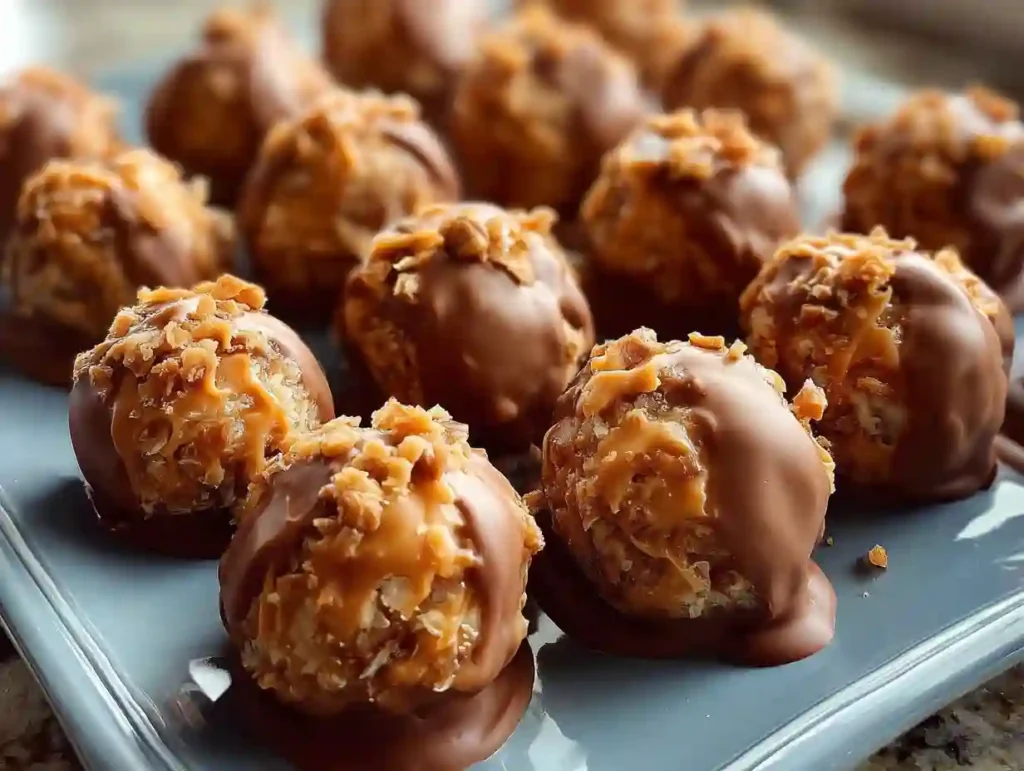
If you’re craving a sweet, crunchy, and chocolatey treat that comes together in no time, these Butterfinger Balls are about to become your new favorite dessert. With just a few simple ingredients — peanut butter, crushed Butterfinger candy bars, powdered sugar, and melted chocolate — this no-bake treat offers a perfect balance of creamy, crunchy, and rich flavors. Ideal for holidays, parties, or anytime you want something indulgent without turning on the oven, these bite-sized balls are sure to disappear fast!
Why You’ll Love Butterfinger Balls
These sweet treats are the perfect combination of chocolate and peanut butter with a delightful crunch from crushed Butterfinger candy bars. They’re incredibly easy to make, don’t require baking, and store well for days. You can whip them up for birthdays, cookie exchanges, or festive dessert trays. Plus, since they’re small and portioned, you can enjoy the sweet satisfaction of Butterfinger flavor without overindulging.
Ingredients You’ll Need
To make these irresistible Butterfinger Balls, you’ll need just a handful of ingredients that are probably already in your pantry. Here’s what you’ll need:
For the filling:
– 1 cup creamy peanut butter
– 2 cups powdered sugar
– 1 teaspoon vanilla extract
– 1 ½ cups crushed Butterfinger candy bars (about 4 full-size bars)
For the coating:
– 2 cups milk or semi-sweet chocolate chips
– 1 tablespoon coconut oil or shortening (optional, for smoother melting)
Step-by-Step Instructions
Step 1: Crush the Butterfingers
Unwrap your Butterfinger candy bars and place them inside a zip-top bag. Use a rolling pin to crush them into small, crunchy bits. You want them fine enough to mix easily but still have texture for that signature Butterfinger crunch.
Step 2: Make the Peanut Butter Mixture
In a large mixing bowl, combine the creamy peanut butter, powdered sugar, and vanilla extract. Stir until fully combined and smooth. Then, fold in the crushed Butterfinger pieces until evenly distributed throughout the mixture.
Step 3: Shape the Balls
Scoop out small portions of the mixture (about 1 tablespoon each) and roll them into bite-sized balls using your hands. Place the shaped balls on a parchment-lined baking sheet. Once all the mixture has been rolled, place the tray in the refrigerator for about 30 minutes to firm up.
Step 4: Melt the Chocolate
Add chocolate chips (and coconut oil, if using) to a microwave-safe bowl. Microwave in 30-second intervals, stirring between each, until the chocolate is smooth and completely melted. You can also use a double boiler if you prefer a slower melting process.
Step 5: Dip the Balls
Remove the chilled peanut butter balls from the fridge. Using a fork or toothpick, dip each ball into the melted chocolate, ensuring it’s fully coated. Allow any excess chocolate to drip off before placing it back on the parchment-lined tray.
Step 6: Chill and Serve
Once all the balls are coated in chocolate, refrigerate them again for about 20–30 minutes or until the chocolate sets completely. After that, your Butterfinger Balls are ready to enjoy!
Tips for Perfect Butterfinger Balls
– Choose the right peanut butter: Use creamy peanut butter for the smoothest texture. Avoid natural peanut butter that separates, as it can make the mixture too oily or crumbly.
– Make them ahead of time: These no-bake treats store well in an airtight container in the refrigerator for up to 1 week. You can also freeze them for up to 3 months for longer storage.
– Customize the coating: Instead of milk chocolate, try using white chocolate, dark chocolate, or even drizzle a bit of caramel over the top for a gourmet twist.
– Use a cookie scoop: For uniform-sized balls that look professional and consistent, use a small cookie scoop to measure each portion.
Serving Ideas
Butterfinger Balls are delicious on their own, but you can also add them to dessert platters, gift boxes, or party trays. Serve them chilled for a firmer texture, or slightly softened for a melt-in-your-mouth experience. Pair them with coffee, hot chocolate, or a glass of cold milk for a delightful sweet treat. You can even crumble them over ice cream or add them to milkshakes for a crunchy, peanut-buttery upgrade.
Storage Instructions
After the chocolate coating has fully set, place the Butterfinger Balls in an airtight container. If stacking them, separate the layers with parchment paper to prevent sticking. Store them in the refrigerator for up to 7 days or freeze them for longer-term enjoyment. To serve from frozen, simply let them sit at room temperature for about 10 minutes before eating.
Print
Sweet and Crunchy Butterfinger Balls Recipe – Easy No-Bake Dessert
Ingredients
For the filling:
– 1 cup creamy peanut butter
– 2 cups powdered sugar
– 1 teaspoon vanilla extract
– 1 ½ cups crushed Butterfinger candy bars (about 4 full-size bars)
For the coating:
– 2 cups milk or semi-sweet chocolate chips
– 1 tablespoon coconut oil or shortening (optional, for smoother melting)
Instructions
Step 1: Crush the Butterfingers
Unwrap your Butterfinger candy bars and place them inside a zip-top bag. Use a rolling pin to crush them into small, crunchy bits. You want them fine enough to mix easily but still have texture for that signature Butterfinger crunch.
Step 2: Make the Peanut Butter Mixture
In a large mixing bowl, combine the creamy peanut butter, powdered sugar, and vanilla extract. Stir until fully combined and smooth. Then, fold in the crushed Butterfinger pieces until evenly distributed throughout the mixture.
Step 3: Shape the Balls
Scoop out small portions of the mixture (about 1 tablespoon each) and roll them into bite-sized balls using your hands. Place the shaped balls on a parchment-lined baking sheet. Once all the mixture has been rolled, place the tray in the refrigerator for about 30 minutes to firm up.
Step 4: Melt the Chocolate
Add chocolate chips (and coconut oil, if using) to a microwave-safe bowl. Microwave in 30-second intervals, stirring between each, until the chocolate is smooth and completely melted. You can also use a double boiler if you prefer a slower melting process.
Step 5: Dip the Balls
Remove the chilled peanut butter balls from the fridge. Using a fork or toothpick, dip each ball into the melted chocolate, ensuring it’s fully coated. Allow any excess chocolate to drip off before placing it back on the parchment-lined tray.
Step 6: Chill and Serve
Once all the balls are coated in chocolate, refrigerate them again for about 20–30 minutes or until the chocolate sets completely. After that, your Butterfinger Balls are ready to enjoy!
Nutritional Information (Per Serving)
These values are approximate and can vary depending on the specific ingredients used.
Calories: 180
Fat: 10g
Carbohydrates: 19g
Sugar: 15g
Protein: 3g
Final Thoughts
Butterfinger Balls are the ultimate combination of chocolate, peanut butter, and crunchy candy goodness — and the best part is, they’re effortless to make. With no baking required, they’re perfect for busy days, holidays, or last-minute dessert cravings. Whether you’re making them for yourself or to share with loved ones, these bite-sized delights are guaranteed to impress.
Give this recipe a try and experience the joy of a homemade treat that tastes like it came straight from a candy shop. Once you make them, you’ll understand why Butterfinger Balls are everyone’s favorite no-bake indulgence!