
Creating a dessert that’s both effortless and irresistibly decadent can feel like a rare accomplishment—but these Cream Cheese Squares deliver just that. With minimal ingredients and virtually no special equipment, you’ll layer buttery crescent dough, a velvety sweet cream cheese filling, and a crisp cinnamon-sugar topping into a bar that tastes like the best part of cheesecake and pastry colliding. Perfect for bringing to potlucks, serving at brunch, or simply enjoying as an after-dinner treat, these gooey bars disappear fast. Read on for step-by-step guidance, pro tips, variations, and everything you need to master this crowd-pleasing recipe.
Why You’ll Love These Cream Cheese Squares
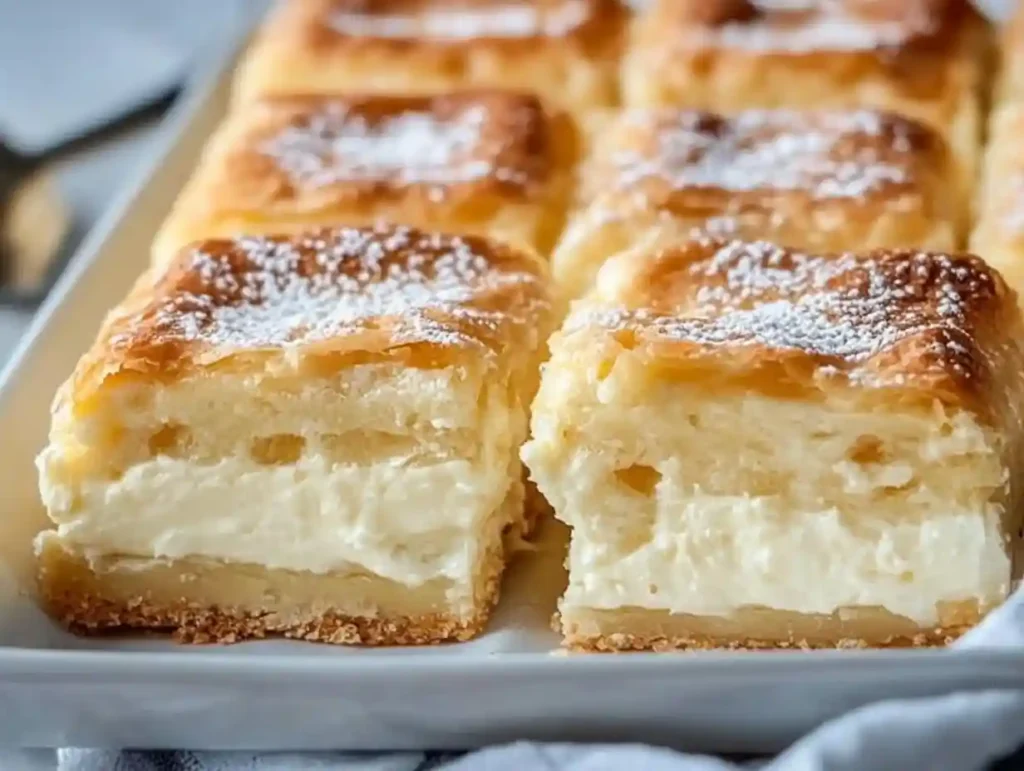
- Incredible Flavor & Texture Contrast
Each square starts with a golden, slightly flaky crust, followed by a rich, creamy center, and finishes with a sweet crunchy cinnamon sugar topping. This medley of textures keeps each bite interesting and deeply satisfying. - Minimal Prep, Maximum Impact
You don’t need to mix complicated dough or chill filling overnight. With just three basic steps—layer, pour, and bake—you’ll have a showstopper in under 35 minutes. - Versatile & Customizable
While this classic version is irresistible on its own, you can riff on flavors—lemon zest, fruit swirls, nut toppings—to match seasonal cravings or personal preferences. - Make-Ahead Convenience
These bars keep well in the fridge for several days and can even be frozen. That makes them ideal for planning ahead for gatherings or for quick weekday dessert cravings. - Budget and Pantry Friendly
Crescent roll dough, cream cheese, sugar, and pantry spices form the backbone of this recipe—ingredients that are often on hand or easy to grab at any supermarket.
Ingredients (yields one 9×13-inch pan, 24 squares)
Dough Layers
- 2 (8-oz) cans refrigerated crescent roll dough, classic variety (not biscuits)
Cream Cheese Filling
- 2 (8-oz) packages cream cheese, softened to room temperature
- 1 cup granulated sugar
Cinnamon-Sugar Topping
- ½ cup (1 stick) unsalted butter, melted (reserve 1–2 tablespoons for later)
- ¼ cup granulated sugar
- 1 teaspoon ground cinnamon
Flavored Variations (optional)
- 1 tablespoon lemon zest
- ¼ cup fruit jam (raspberry or strawberry) for swirls
- ½ cup chopped nuts (pecans or almonds)
- 1 teaspoon pumpkin pie spice
Step-by-Step Instructions
1. Prepare Your Workspace & Pan
Preheat the oven to 350°F (175°C). Lightly grease a 9×13-inch baking pan with butter or non-stick spray. Having the pan ready ensures you can move quickly once your layers are assembled.
2. Seal the First Dough Layer
Unroll one can of crescent roll dough and carefully press it into the bottom of the prepared pan. Pinch together the seams and perforations to create a continuous layer—this prevents the cream cheese filling from oozing through.
3. Whip Up the Cream Cheese Filling
In a medium bowl, use a sturdy whisk or rubber spatula to blend the softened cream cheese and one cup of granulated sugar until smooth and lump-free. Avoid over-beating; you want a silky texture without incorporating too much air.
Pro Tip: For a brighter flavor, stir in a tablespoon of lemon zest or a teaspoon of vanilla extract.
4. Spread the Filling
Spoon the cream cheese mixture evenly over the first dough layer, using an offset spatula to smooth the surface. Leave a small border around the edges to anchor the top dough layer.
5. Layer the Second Dough Sheet
Carefully unroll the second can of crescent roll dough and drape it evenly over the cream cheese filling. Again, seal seams and edges by pinching. The filling should remain puffed and distinct—avoid pressing down.
6. Add the Melted Butter
Pour ½ cup of melted butter slowly over the top dough layer, making sure it coats evenly. If you reserved a tablespoon or two, drizzle that on the border to ensure even browning.
7. Sprinkle Cinnamon-Sugar
In a small bowl, combine ¼ cup sugar and one teaspoon cinnamon (or add pumpkin pie spice during autumn). Using a fine sieve or gentle hand, dust the cinnamon-sugar mixture over the buttered dough. This creates a crisp, caramelized finish.
8. Bake to Golden Perfection
Place the pan on the center rack and bake for 25–30 minutes. Look for a light golden brown on top and slightly firm edges around the pan. The center should be set but still soft—any jiggle will resolve as it cools.
9. Cool, Slice & Serve
Allow the dessert to cool in the pan for at least 15 minutes—this rest time helps the layers stabilize. Using a sharp knife (wiped clean between cuts), slice into 24 equal squares. Serve warm for gooey centers or at room temperature for cleaner bites.
Pro Tips & Troubleshooting
- Prevent Dough Shrinkage: Make sure your dough is at room temperature before unrolling; cold dough can crack.
- Seal Thoroughly: Properly pressing seams stops filling leaks and ensures tidy squares.
- Rest Before Cutting: Cutting too soon leads to sloppy bars; a 15-minute rest yields neat squares.
- Custom Spices: Add nutmeg, allspice, or ginger to the sugar topping for seasonal flair.
- Avoid Overbaking: Once the edges caramelize, do not exceed the baking time, or the filling may dry out.
Delicious Variations
- Berry Swirl Cream Cheese Bars: After spreading the cream cheese layer, dot ¼ cup of your favorite fruit jam across the surface. Use a butter knife to swirl gently before adding the top dough.
- Nutty Crunch Topping: Mix ½ cup chopped pecans or walnuts into the cinnamon-sugar topping for extra texture and flavor.
- Pumpkin Spice Twist: Replace the cinnamon with pumpkin pie spice and add 2 tablespoons of canned pure pumpkin to the cream cheese filling for autumn vibes.
- Chocolate Lovers’ Dream: Fold ½ cup of mini chocolate chips into the cream cheese filling or drizzle a melted chocolate ganache over the cooled bars.
Serving Suggestions
- Brunch Buffets: Arrange squares on tiered stands alongside fruit platters and quiches for a complete morning spread.
- Coffee Pairing: Serve with freshly brewed coffee, espresso, or a latte—sweet bars and bitter coffee play beautifully together.
- Dessert Board: Combine with other bite-sized sweets, fresh berries, and nuts for an elegant dessert charcuterie board.
- Afternoon Tea: Offer alongside scones and finger sandwiches for a classic tea party feel.
Storage & Make-Ahead Instructions
- Room Temperature: Store cooled squares in an airtight container for up to 48 hours.
- Store in an airtight container and refrigerate for up to five days. To reheat, bake the squares at 300°F for 5–7 minutes to revive their gooey texture.
- Freezing: Individually wrap squares in plastic wrap and place in a freezer-safe bag. Freeze for up to 1 month. Thaw overnight in the refrigerator and reheat if desired.
Nutritional Snapshot (per square)
- Calories: 213
- Total Fat: 14 g
- Saturated Fat: 6 g
- Cholesterol: 21 mg
- Sodium: 246 mg
- Carbohydrates: 18 g
- Sugars: 12 g
- Protein: 3 g
Why Crescent Dough?
Using refrigerated crescent dough offers convenience—no yeast activation or rolling out homemade dough. Its buttery flavor and pre-scored seams make assembly quick, transforming a complicated pastry task into an approachable one that even baking beginners can conquer.
Final Thoughts
With just two cans of crescent dough and a handful of pantry ingredients, these Cream Cheese Squares deliver a rich, gooey dessert that’s impossible to resist. Whether you crave a showstopping brunch centerpiece, an easy potluck contribution, or a comforting weeknight treat, this recipe offers flexibility, flavor, and simplicity. Dive into a square warm from the oven and experience the magic of a cheesecakey filling sandwiched between tender, buttery pastry—a symphony of sweetness in every bite. Enjoy!