
A Simple Frozen Treat Anyone Can Make at Home
There’s something truly special about homemade ice cream. The creamy texture, the fresh flavors, and the satisfaction of making it yourself turn a simple dessert into a memorable experience. But what if you could enjoy all of that without needing an expensive ice cream machine or complicated techniques?
That’s exactly what homemade no-churn ice cream offers. With just a few basic ingredients and minimal effort, you can create a rich, smooth, and delicious frozen dessert right in your own kitchen. This method is perfect for beginners, busy families, or anyone who wants a quick and foolproof way to make ice cream at home.
Whether you’re craving classic vanilla, indulgent chocolate, or something more creative, this no-churn recipe gives you a versatile base to build endless flavors.
Why You’ll Love This No-Churn Ice Cream Recipe
This recipe has become a favorite for good reason. It’s incredibly easy, requires no special equipment, and delivers results that rival traditional ice cream.
First, there’s no need for an ice cream maker. Everything comes together with a simple mixing process, making it accessible to anyone. Second, the texture is beautifully creamy and smooth, thanks to the combination of whipped cream and sweetened condensed milk.
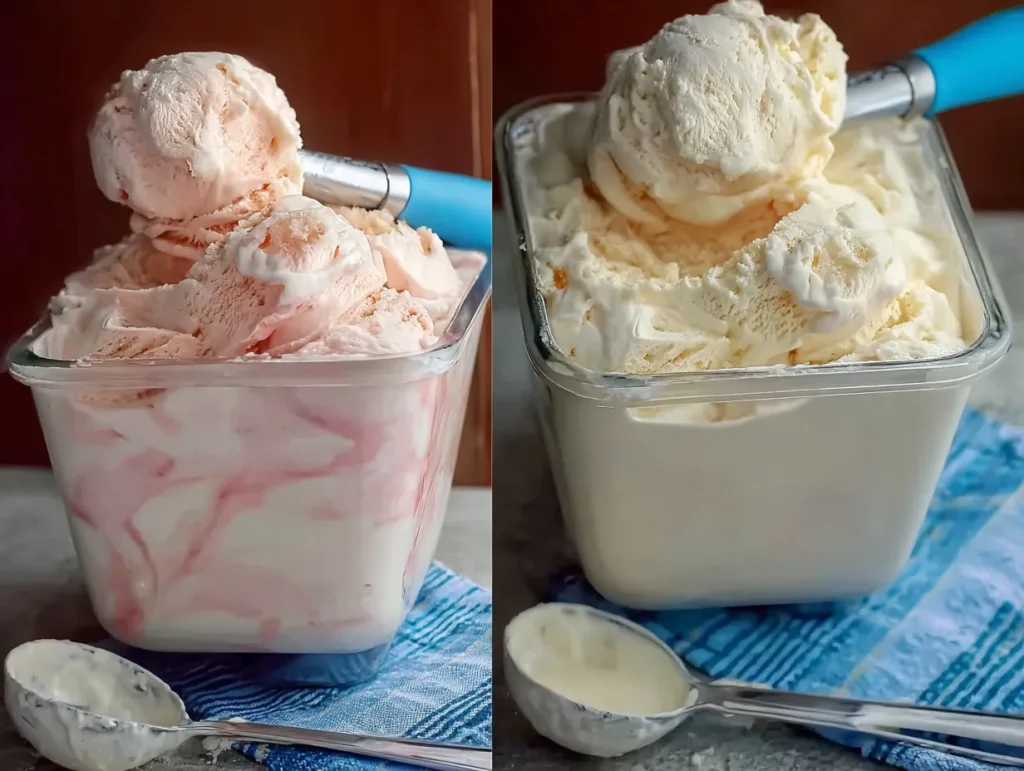
Another advantage is flexibility. You can customize the flavors however you like, from fruity to chocolatey or even nutty combinations. It’s also a great make-ahead dessert since it stores well in the freezer.
Ingredients You’ll Need
This recipe uses only a handful of ingredients, most of which you probably already have at home.
For the base:
- Two cups of heavy whipping cream, cold
- One can (14 ounces) sweetened condensed milk
- One teaspoon pure vanilla extract
Optional add-ins:
- Chocolate chips, crushed cookies, caramel sauce, fresh fruit, or nuts
How to Make No-Churn Ice Cream
Step 1: Whip the Cream
Start by pouring the cold heavy cream into a large mixing bowl. Using a hand mixer or stand mixer, whip the cream on medium-high speed until stiff peaks form. This means the cream should hold its shape when you lift the beaters.
This step is essential because it creates the light, airy structure that replaces the need for churning.
Step 2: Mix the Base
In a separate bowl, combine the sweetened condensed milk and vanilla extract. Stir until smooth and fully blended.
Step 3: Fold the Ingredients Together
Gently fold the whipped cream into the condensed milk mixture. Use a spatula and slow, careful motions to keep the mixture light and airy. Avoid overmixing, as this can deflate the cream.
Step 4: Add Flavor (Optional)
At this stage, you can mix in your favorite add-ins. Whether it’s chocolate chips, fruit, or cookie pieces, this is where you customize your ice cream.
Step 5: Freeze
Transfer the mixture into a loaf pan or airtight container. Smooth the top, cover with plastic wrap or a lid, and place it in the freezer.
Let it freeze for at least 6 hours, or overnight for best results.
Step 6: Serve and Enjoy
Once frozen, scoop the ice cream into bowls or cones and enjoy your homemade creation. The texture should be creamy, smooth, and easy to scoop.
Flavor Ideas to Try
One of the best things about no-churn ice cream is how easy it is to customize. Here are some ideas to inspire you.
For a chocolate version, add cocoa powder to the condensed milk and mix in chocolate chips. If you love cookies and cream, fold in crushed chocolate sandwich cookies.
For a fruity twist, swirl in strawberry puree or add fresh berries. Mango, blueberry, and raspberry all work beautifully.
If you enjoy caramel flavors, drizzle caramel sauce into the mixture and lightly swirl it before freezing.
Coffee lovers can dissolve a teaspoon of instant coffee into the condensed milk for a rich, bold flavor.
Tips for the Best Results
For the creamiest texture, always use cold heavy cream. This helps it whip properly and hold its structure.
Be gentle when folding the whipped cream into the base. Keeping the air in the mixture is key to achieving that soft, creamy consistency.
Avoid adding too much liquid flavoring, as it can create ice crystals. Stick to thicker add-ins or concentrated flavors.
Let the ice cream sit at room temperature for a few minutes before scooping. This makes serving easier and improves texture.
Serving Suggestions
This homemade ice cream is delicious on its own, but you can elevate it with simple additions.
Serve it in a cone for a classic treat, or in a bowl topped with chocolate syrup, nuts, or whipped cream.
It pairs wonderfully with warm desserts like brownies, pies, or cookies. The contrast between hot and cold creates an irresistible combination.
You can also use it to make ice cream sandwiches or milkshakes for a fun twist.
Storage Tips
Store your no-churn ice cream in an airtight container in the freezer. It will stay fresh for up to two weeks.
To prevent ice crystals, press a layer of plastic wrap directly onto the surface before sealing the container.
If the ice cream becomes too firm, let it sit out for a few minutes before scooping.
Why No-Churn Ice Cream Works
Traditional ice cream relies on churning to incorporate air and prevent ice crystals from forming. In this recipe, whipped cream takes over that role by adding air naturally.
The sweetened condensed milk provides sweetness and a smooth texture while lowering the freezing point, which helps keep the ice cream soft and scoopable.
The result is a perfectly balanced dessert that feels just as indulgent as classic ice cream—without the extra work.
Final Thoughts
Homemade no-churn ice cream proves that you don’t need complicated tools or techniques to create something delicious. With just a few ingredients and a little patience, you can make a creamy, flavorful dessert that everyone will love.
It’s simple, customizable, and perfect for any occasion—from casual family nights to special celebrations.
Once you try it, you’ll see why this method has become a favorite for home cooks everywhere. One batch is all it takes to turn your kitchen into your own personal ice cream shop.